Taking Your First Step Towards HDR Photography

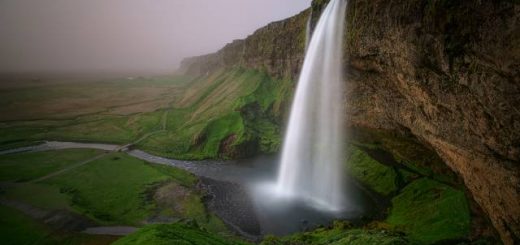
Ever seen beautiful images that bewilder you for a moment? Mountains covered with clouds that are set in action or a waterfall that seems cascading are pretty examples of HDR Photography. Let us now see what HDR refers to…High Dynamic Range photography refers to the set of photography that involves all those methods that render photos with high contrast and quality created due to the use of vastly different levels of light. By employing high dynamic range techniques we can see photographed scenes as if we are viewing them with naked eye. Different snapshots of the same scene are taken and then processed to get HDR photos. Let’s discuss some useful techniques and tips for taking great HDR photos.
[post_ads_1]

Camera Features
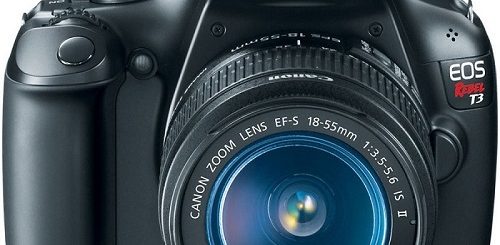
HDR photography can really be awesome! All you need is a standard camera. Get a camera which has auto bracketing option i.e. AEB. They take multiple shots simultaneously. Learn about how to use the camera by studying the manual. The higher the number of frames per second your camera captures, the easier it is to get multiple images for exactly the same scene. Similarly, your camera shouldn’t be slow in storing those images in the memory. You might have the good old film camera giving you good results but if you decide on taking HDR photos then its time to switch to the digital one.

Shooting

The same rule of getting exact images of the same scene applies here. Take the photos as quickly as possible. Lock white balance, aperture and focus and turn off the automatic settings of the camera. Activate the burst mode of the camera, if it is available.
Supporting Equipment
Get a leveling base plate if you want to make high resolution panoramas. Tripod, as we all know, is the support tool to keep camera still when shooting those photos. When it comes to HDR photos, it not only prevents the blur but also images with various exposure levels are bracketed without any change in the captured details.
Post Processing – Software

In addition to cameras HDR photography relies heavily on the software used in further processing of the images taken. Photomatix is one of the popular software programs being used in the industry for creating great HDR photos. It saves you from carrying light equipment while shooting and gives great results on photos shot on cloudy days.
Photoshop is another great software that helps in post processing of HDR photos. The company has released the version which is specific to HDR photography and creates realistic HDR photos.
There are some other programs which present easy to use interface and have some powerful features. These are Artizen HDR, Dynamic Photo HDR and HDR Photostudio. While buying the software, make sure that it is compatible with the operating system you are using.
[post_ads_2]
Lenses

Always clean the lens before shooting so that your photo don’t suffer from any possible glare from the shiny surfaces. In general, wide angle rectilinear lenses are used. FishEye lenses are useful in saving processing efforts through software. Medium sized aperture is good to use for HDR photos.
HDR photography makes it possible for us to view images with different tonal values combined into one. Requirements for such high quality images are different from ordinary photos. HDR photography requires patience and hard work, but the end results are worth it!
[leaderboard_bottom_ads]

I have just started using Mediachance Dynamic Photo HDR as a stand-alone processor. But instead of following the normal workflow, (which is dependent on shooting three bracketed images) I have started with a fairly well exposed shot and created exposure variations from RAW files in ACR. Then saved the three files as JPEGs and imported into DP HDR with very good results. Of course this method guarantees absolute registration of all of the images and I can work with a vast array of shots from my archive. I wonder if anyone else does it like this?